
John Newingham
Finished Track Still Wet
John's track on the left and
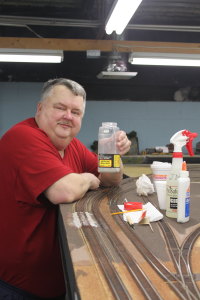

George's on the right after glue has dried
BALLASTING PROCESS
Nothing can make a layout more unpleasing to the eye and cause more derailments than improperly laid track ballast. By following these easy steps your ballast job will look more prototypical, last longer, and cause fewer derailments.
Step 1: Lay your roadbed and track onto the layout surface. (See laying track and roadbed instructional). You can attach the roadbed and track with an adhesive, rail nails or both depending on the underlayment. If the underlayment is plywood or homosote, or both, nails will suffice. If you use foam board for an underlayment then using an adhesive is best. An adhesive made by GE called “Max 3500 clear” is recommended. What ever adhesive you use it should dry clear. Use the adhesive sparingly when putting down track. Gluing the ballast in and around the track will also help keep the track in place, which is described in the next several steps.
Step 2: After attaching the roadbed and track to the layout, the next step is to ballast the sides of the roadbed. With a small paint brush apply full strength white glue to the beveled sides of the roadbed and the area adjacent to the roadbed (1/8 to ¼ inch) that you want to ballast.
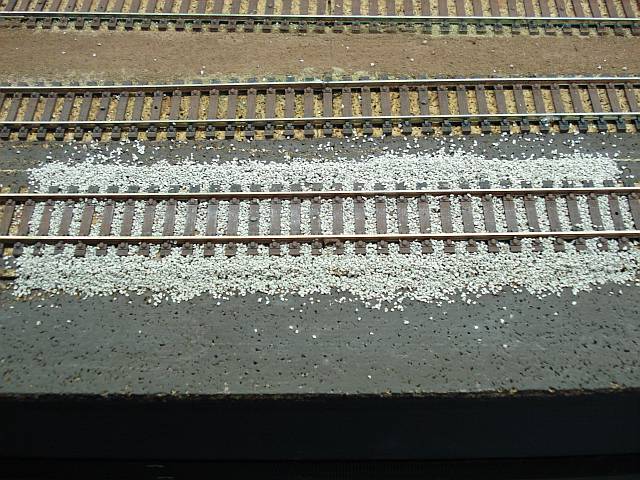
Step3 Carefully sprinkle your roadbed ballast material onto the beveled side of the roadbed and onto the area adjacent to the roadbed. To sprinkle the ballast material you can use a small spoon, or a simple tool made from cardboard. The tool can be made from folding a small piece of cardboard in half and cutting off one end forming a point. It is from this pointed end that you can control the amount of ballasting material that you place on the roadbed. This step is very critical. You do not want an excessive amount of ballast going onto the track. “LESS BALLAST IS BETTER THAN TOO MUCH”. The ballast you use can be a medium grade, a course grade, or a mixture of both. The medium grade or a mixture seems to appear more life like with HO scale than the course grade. The color of the ballast is up to the individual.
Step 4. With a small piece of cardboard lightly press the ballasting material into the glue on the sides of the roadbed and the surrounding area. At this time very lightly spray a mixture of water and several drops of liquid soap, (wet water) onto the ballast. This will cause the glue to rise up into the ballast material and spread evenly. This is important because you want the glue to come in contact with all of the ballast material thus causing it to remain adhered to the roadbed and not becoming loose, Loose ballast will over time become lodged in rail switches and track causing derailments. Let the ballast dry for 24 hours.
Step 5: To ballast the area between the rails and the area between the rail ties just on the outside of the rails you spread the ballast material between the rail ties using a small spoon, or the cardboard tool that you made being careful not to over ballast the area. At this point you carefully remove any ballasting material from the tops of the rail ties by using a small brush, your finger tip, or a razor knife. Make sure that all of the ballasting material has been removed from the tops of the ties and next to the rails, especially the inside of the rails. This is where the rail car wheels ride and any excess ballast will cause the rail cars to derail. Note: When ballasting around a rail switch, or a crossover be extra careful not to get ballast into the switching mechanism or the rail frog. This will cause the switch to malfunction, or the train to derail at the rail frog.
Step 6: Lightly spray the ballasting material that you have just laid down with “wet water”. There is no need to be concerned with getting water on the tracks as it will dry and can be cleaned later with a track cleaner. Note: When spraying “wet water” near switches it is a good idea to take pieces of masking tape and cover the switch mechanism so as to keep it dry.
Step 7: Apply a mixture of several drops of liquid soap, 2and1/2 parts water to 1 part white glue (matte medium) to the area between the rails and to the area just on the outside of the rails. This mixture will seep down between the rails and ties thus assuring a tight glue job when it dries. The best way to apply this glue, soap and water mixture is with an eye dropper or a pipette. Insure that you don’t get glue on the tops of the rails as it will just have to be cleaned of later. If glue does get on the rails just take a piece of paper towel and wipe it off. Note: Keep glue away from any rail switches and rail frogs. Glue will keep the switch from operating properly.
Step 8: Allow the ballasted area to dry for 24 hours. It is especially important that all ballasting material is dry and glued solid. To remove any lose ballast take a small vacuum, or a brush and lightly go over the area to remove any loose ballast. You may have to re-ballast an area if enough of the ballast has not adhered properly.
Step 9: After the ballasted area has been allowed to dry, take a razor knife and clean off any ballast that may have accumulated on the inside of the rails and the rail ties during the ballasting process. This is a critical step. Any ballast left on the rail ties or the inside of the rail will lead to train derailments.
Step 10: After completing ballasting process make sure that you thoroughly rinse with water any utensil (eye dropper, brush, or spray bottle) that was used to apply glue or a glue/water mixture. Always clean your tools and work area after completing a job. It will make your next job that much easier.
Note: If you plan to scenic your layout further it is a good idea to cover your just completed, and professional ballasting job. Do this with a strip of masking tape wide enough to cover the track and ballast on either side. Lightly adhere the tape to the track as sticking it to the ballast material might pull it up when you remove the tape. In this way you will protect the track and ballasting job that you have just completed, and you won’t have to do any unnecessary and difficult clean up after your scenicing job is complete.
Ballasting Tools
- Spray bottle with wet water (water and liquid soap)
- 50/50 white glue and water with several drops of liquid soap
- Bottle of white glue
- Bottle of super tacky glue
- Ballast – coarseness and color up to individual
- Paint brushes – different sizes
- Pipette or eye dropper
- Razor knife – small and large
- Sculptors knife
- Paper towels
- Self made cardboard ballast laying tool, or small spoon